Continuing the discussion from Running your own OFN (as Super-Admin):
Once you have your brand spanking new OFN, you’re ready to start getting things set-up.
You are likely to have one super-admin user . . so first things first..
When you’re logged in as super-admin, click on ‘configuration’ in the top blue menu.
Configuration
General Settings
Check:
- Site name and URL
Mail Methods
- Will be set up already
Image Setting
- Will be set up already
Tax categories, tax rates, tax settings
- Create your tax categories in ‘tax categories’. This is just the name of the categories.
- In ‘tax rate’ you can apply the calculator to the ‘tax categories’ you have created.
- In tax settings, you can select if the tax selection is compulsory, if it is applied to shipping and billing
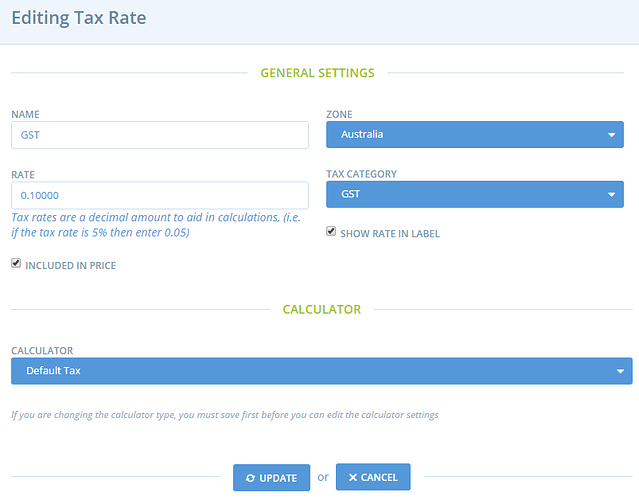
For your reference, the image below shows Australia’s flat rate 10% tax in ‘tax rate’
Zones, Countries States
Payment Methods
- Allow users to create their own payment methods. Don’t need to do anything as super-admin.
Taxonomies
You need to have product categories set-up before you can start creating products, as every Product must have a product category.
=> Configuration / Taxonomies
Any taxonomies, and entries within them, that you create will become available as Product Categories to attach to products. We HIGHLY recommend that you keep them high-level . . these product categories will become the filters at the top of your list views and shop-front and you do not want too many in use across your site

You can attach icons to product categories
*Shipping methods
shipping categories
- This is where you can create optional shipping categories to be applied to products. Such as ‘refrigerated’. Any categories created here can be applied to products when you start creating products.
Inventory settings
- In Australia neither of these options are selected.
Analytics tracker.
- You can install an analytics tracker here. Non-essential.
CMS Admin
- This tab is no longer active. Ignore.
Enterprise Fees
- Super-admin can ignore this tab. Enterprises should create their own enterprise fees.
Content
This is where you can customise some pages. See further instrcutions here… http://community.openfoodnetwork.org/t/configuration-content/307
Accounts and Billing
- This is where you can set-up billing. This is billing from the OFN to enterprises for the use of the software. http://community.openfoodnetwork.org/t/enterprise-user-accounts-configuration-accounts-billing/348
Producer and Product Properties
Read more details on how these work and the kind of things to set them to. The Australian set are shown below - these are the options enterprise users can choose from

To set up, go to
=> Products / Properties
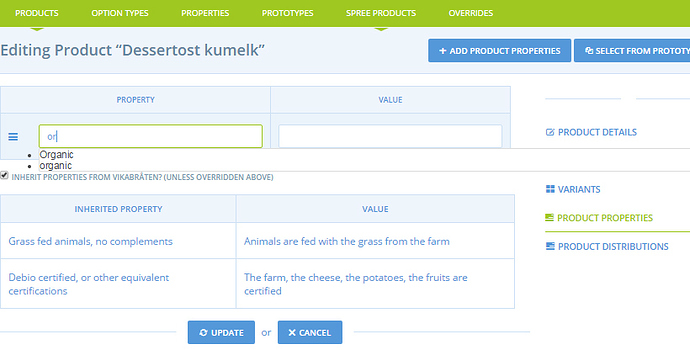
BE CAREFUL: on the product page, when you add properties to a product through your super-admin account, you are not proposed the existing list of properties, you have to start typing for a suggestion to appear, and you are not blocked if you write a new property, which will be added to the whole properties list… so there is a high risk of creating duplicates, that then will be proposed in the general list and generate confusion! So the easiest way to avoid mistakes is to always use a regular “user account” when working on tasks related to hubs and products administration. Don’t add products when using your super-admin account ![]()
Users
You will have a super-admin user. We recommend that you create some Enterprise Users to start setting up, especially if you’re setting up Hubs (read more about Users here. Getting your Users and Enterprises right will save a lot of manual fiddling around later.
e.g.
- Create a User (click users in the blue menu, then new user)
- set their # of allowed Enterprises to >1 (e.g. 10)
- if you click the ‘admin’ box, it will give this user super-admin permission. Create some non super admin users.
- Create an Enterprise (click enterprises, + new enterprise)
- Once you have created a users, you can make them the owner of this new enterprise.
- set type Any to make it a Hub (read more about Enterprise Types) and how to manage them
- Login as that new User
- now creating additional Producers and Hubs will automatically link these new Enterprises to your first Hub. more about auto-E2E-links
Input Data
Enterprises
NB. You MUST complete the email validation from enterprise confirmation emails. These are sent to the nominated contact email for an enterprise, and the enterprise will not be visible or useable in an Order Cycle until that email has been verified.
NOW you are ready to start building up your working enterprises!
- Create Producers
- profiles
- products and variants
- Create Hubs
- make sure you create shipping and payment methods to make these valid
- Order Cycles
Keep smiling 
This initial configuration can be a bit painful: you are not yet used to the interface, and there can be some bugs also in this “super admin zone”. It’s better to prepare the informations you want to put in before entering them (categories and properties) to avoid multiple modifications. If you experience a bug, try in another browser, that may work better!


